
Upgrading VMware Cloud Foundation (VCF) 9.0.2 to 9.1: The Ultimate Step-by-Step Runbook Phase 5
In the previous blog, we covered the Management Components upgrade as part of the VCF 9.1 upgrade sequence.
In this blog, we will continue the upgrade journey and focus on completing the Core Components upgrade to VCF 9.1, covering the upgrade steps to NSX Manager , vCenter and ESX.
Detailed Step-by-Step NSX Manager Upgrade :
Login to the VCF Operations Manager -> Build -> Lifecycle -> VCF Instance -> MGMT Domain -> Prechecks


The Precheck is green as shown in the above screen shot . if u see any error fix it before we start the upgrade. now click on NSX upgrade

NSX Manager upgrade took almost 30mins to finish

With this NSX Manager upgrade is completed successfully if we click on Component Version the NSX Manager version status will still show as Version Drift , that because until we finish the Edge Upgrade and finalize the upgrade the version will not reflect .
Detailed Step-by-Step vCenter Upgrade :
Login to the VCF Operations Manager -> Build -> Lifecycle -> VCF Instance -> MGMT Domain -> Prechecks

We fixed the back as it was failing due to space issue , then re-run the precheck it was all green .


Click on Configure -> Click Finish -> Click Upgrade Now

Once the upgrade was started it got failed on vcenter upgrade set repo , due to proxy issue. so we had to disable the proxy and reboot the vCenter then started the upgrade again


After we restarted the upgrade it passed through the error previous error and then it failed on again with new error , this time it was due to NET FLOW ENABLED as part of VCF Operation Network , in my environment we had an issue with VCF Operations Network collector not visible due to which we removed the VCF Operations Network , thats why i am getting this error as the upgrade was not completed. if this was upgraded we will not hit this issue. To fix this i need to disable the NET Flow on DVS .

Note : as we don't have Ops for Network we are going to disable this in vCenter on DVS Level

After this we restart the upgrade and it got completed

Detailed Step-by-Step ESX Upgrade :
Before we start the ESX upgrade we need to import and assign the ESX Image let see the steps to create , import and assign the image .
Step 1 we create the image or edit the image if already exiting in the vCenter by Login to the vCenter MGMT -> Cluster -> Upgrade -> Image -> Edit the image as per version which we are going to upgrade

Step 2 , once the image is created , we go to SDDC Manager -> Image Management -> Import Image -> Drop select the mgmt vCenter name and click IMPORT


Login to the VCF Operations Manager -> Build -> Lifecycle -> VCF Instance -> MGMT Domain -> Prechecks
Click on Configure

Select the cluster and then assign the image which we imported previously

Keep the default setting and click Next and finish
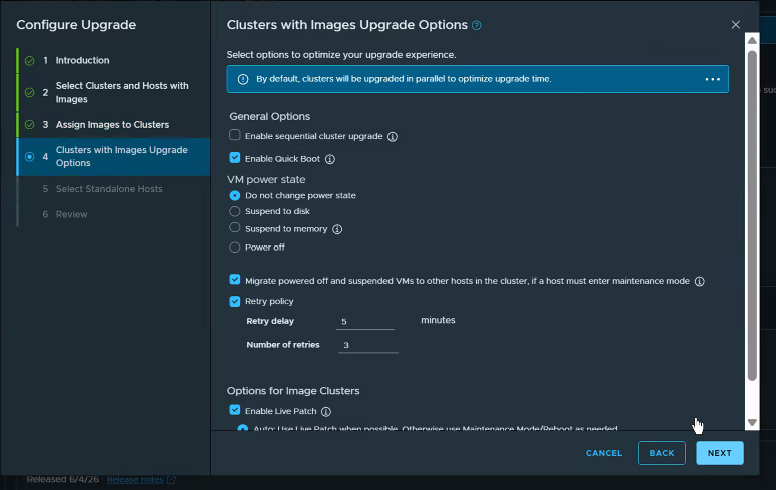
Now Click Upgrade now , this wills start the ESX Upgrade


You can also check the progress on vCenter -> Cluster -> Upgrade . It took 10mins for each node to finish the upgrade.

Now we are the Final stage of the upgrade i.e. NSX Edge Cluster , but in my environment we dont have Edge Cluster ,still we will have to click on the configure button and start the upgrade which will finalize the upgrade .

Once you click on the Component versions you will see now all the version are up to date to 9.1 and status showing as On Target.

With this we have sucessfully completed the upgrade for VCF 9.0 to 9.1 MGMT Domain . Happy Learning !!!!!

Comments